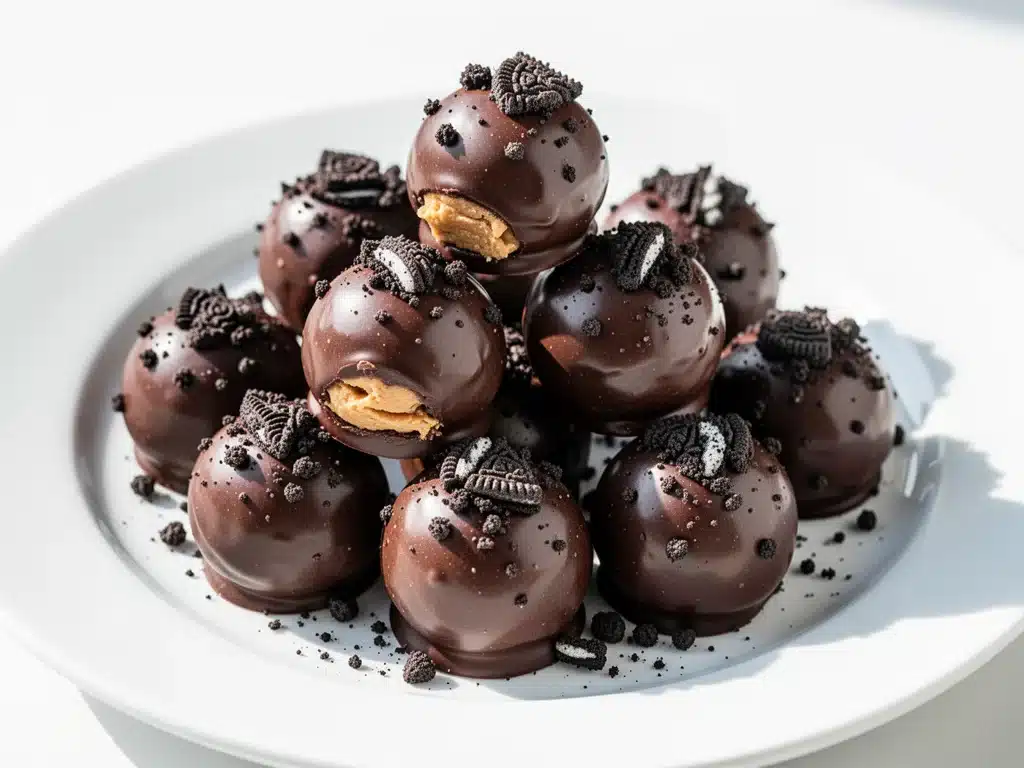
I have a confession to make: I used to think “no-bake desserts” were just a fancy way of saying “I didn’t want to turn on the oven.” And honestly? I was kind of right. For years, I avoided them because they felt like shortcuts that compromised on flavor. I wanted the deep, rich taste of a chocolate cake or the complex layers of a tart, not just a pile of crushed cookies held together by chocolate syrup.
Then came the Great Chocolate Peanut Butter Oreo Truffle Experiment of last month. It started as a desperate attempt to use up three boxes of Oreos I’d bought for my niece’s birthday party that I’d somehow eaten half of before the party even started. I was tired, it was 8 PM, and I didn’t want to bake. I just wanted something sweet, something indulgent, and something that didn’t involve washing a dozen baking dishes.
I threw crushed Oreos, peanut butter, and chocolate chips into a bowl. I mixed it. I chilled it. I rolled it. I dipped it. And then I took one bite.
I stopped. I looked at the counter. I took another bite. That’s when I knew this wasn’t just a “lazy dessert.” This was actually incredible. The texture was perfect—crunchy from the cookie, creamy from the peanut butter, and rich from the chocolate coating. It tasted like a Reese’s Cup had a baby with a brownie, and I was obsessed.
Since then, I’ve made Chocolate Peanut Butter Oreo Truffles probably fifteen times. I’ve made them for office parties, for last-minute dinner guests, and just because I wanted a late-night snack that didn’t make me feel guilty for using real ingredients. They are hands-down the best no-bake dessert I’ve ever tried. And the best part? You only need three main ingredients. Yes, three. That’s it.
If you’re skeptical about no-bake treats, I get it. But this recipe changes the game. It’s not about cutting corners; it’s about letting high-quality ingredients shine without overcomplicating things. These truffles are fudgy, salty, sweet, and utterly addictive. They are the ultimate crowd-pleaser, and I’m going to show you exactly how to make them so you can stop buying expensive store-bought versions and start making your own magic.
Why You’ll Love This Recipe
There are a million dessert recipes out there, but this Chocolate Peanut Butter Oreo Truffles recipe has earned a permanent spot in my rotation. Here’s why it’s worth your time (and your stomach).
Stupidly Simple
I’m not exaggerating when I say this is easier than making toast. You crush cookies, mix in peanut butter, chill the dough, roll balls, and dip them in chocolate. That’s it. No standing over a hot stove, no tempering chocolate (which is terrifying for beginners), and no fancy equipment. If you can mash a banana, you can make these.
Lightning Fast
Active prep time is about 15 minutes. The rest is just chilling time while you do other things. I often make these on a Tuesday night after work. By the time I’ve showered and read a few chapters of my book, they’re ready to eat. It’s the perfect solution for those moments when you need a dessert fix but don’t have the energy to bake.
Three Ingredients, Maximum Flavor
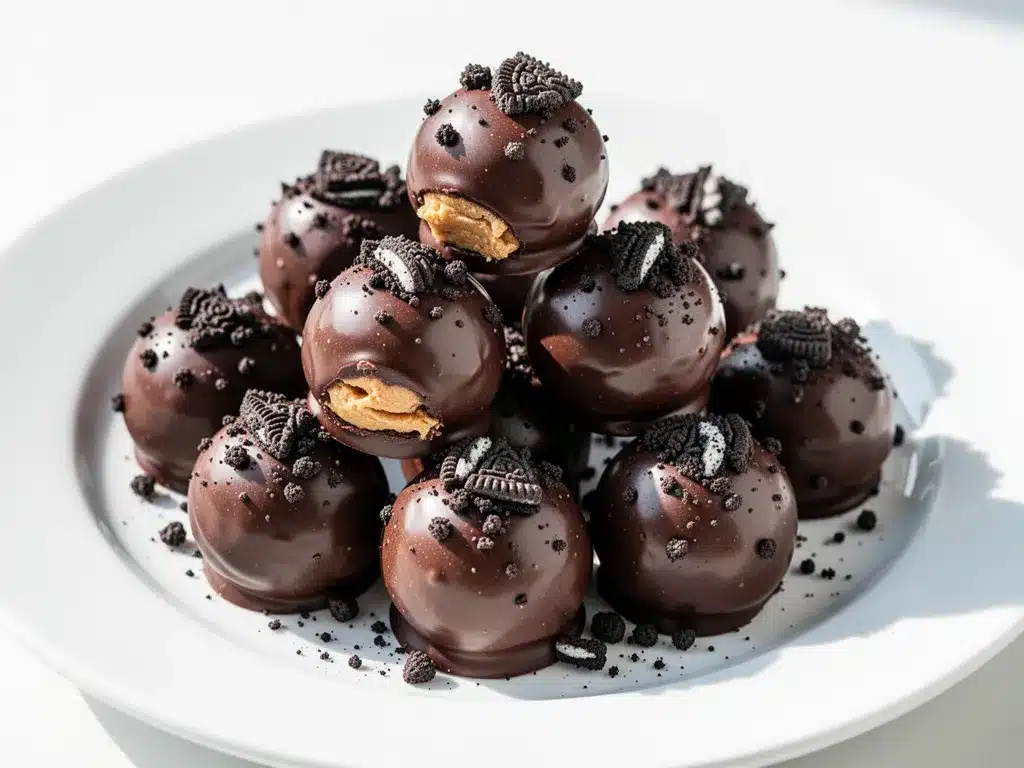
Most no-bake recipes require a pantry full of specific extracts, flours, or thickeners. This one relies on the power of three: Oreos, peanut butter, and chocolate. The saltiness of the cookie, the creaminess of the peanut butter, and the snap of the chocolate create a flavor profile that is balanced and sophisticated. It tastes like you spent hours in a pastry shop, but you didn’t even put on an apron.
Perfect for Gifting
Because they look so professional and fancy, these make incredible gifts. I’ve put them in little cupcake liners, tied them with ribbon, and given them to neighbors, teachers, and coworkers. Everyone thinks you’re a genius baker. (You are. But they don’t need to know it’s this easy.)
Gluten-Free Option Available
Not everyone eats gluten, and that shouldn’t mean missing out on dessert. Because this recipe is so simple, swapping the Oreos for a gluten-free chocolate sandwich cookie works perfectly. The texture holds up, and the flavor is identical. It’s one of the easiest gluten-free desserts to make without sacrificing taste.
Ingredients You’ll Need
Here’s the good news: you probably have most of this already. This Chocolate Peanut Butter Oreo Truffles recipe is famous for its minimal ingredient list, but that doesn’t mean you should skimp on quality. Since there are only three main components, each one carries a lot of weight. Here’s what you need and why it matters.
Chocolate Sandwich Cookies (24 regular Oreos)
Obviously, you need Oreos. But here’s the trick: you need the regular, full-fat version. The low-fat or reduced-sugar versions don’t have the same moisture content or flavor, and your truffles might turn out dry or crumbly. If you’re doing gluten-free, look for a brand like Glutino or Kinnikinnick that has a soft, chewy texture. Avoid the super crisp gluten-free cookies; they don’t crush as well into a dough.
Creamy Peanut Butter (½ cup / 120g)
This is non-negotiable. You need creamy peanut butter. Crunchy peanut butter will create weird lumps in your truffles that are hard to roll. But more importantly, you need natural or conventional peanut butter that is smooth and spreadable. Avoid “no-stir” processed brands that are full of hydrogenated oils if you can help it—they can sometimes make the mixture too oily. Jif or Skippy work great if you want consistency. If you’re using natural peanut butter, make sure it’s well-stirred and not too runny. If it’s super oily, you might need to chill it in the fridge for a bit before measuring.
Chocolate Chips (1 cup / 170g, divided)
You’ll use half of the chocolate chips to mix into the truffle dough for extra richness, and half to melt for the coating. I recommend using semi-sweet chocolate chips for the coating. They have the perfect balance of sweetness and bitterness to contrast with the sweet cookies and peanut butter. Milk chocolate chips work if you have a serious sweet tooth, but they can be cloying. Dark chocolate chips are also an option, but they might make the truffles taste a bit too bitter for some palates. For the dough, you can use the same chips or swap them for chopped chocolate bars for a more artisanal feel.
Optional Add-Ins
While the classic trio is perfect, I sometimes add a pinch of sea salt on top of the truffles before the chocolate sets. It elevates the peanut butter flavor massively. You can also mix in a teaspoon of vanilla extract if you want a deeper flavor profile, but it’s not strictly necessary.
Equipment Needed
You don’t need a fancy kitchen for this. Here’s what I actually use, along with some alternatives.
- Food Processor or Ziplock Bag — I use a food processor because it’s fast and gives me uniform crumbs. But if you don’t have one, put the Oreos in a heavy-duty ziplock bag and crush them with a rolling pin. It’s a bit of an arm workout, but it works.
- Mixing Bowls — Two medium-sized bowls. One for the cookie crumbs and peanut butter mixture, and one for melting the chocolate.
- Microwave-Safe Bowl — For melting the chocolate. Glass or ceramic works best. If you don’t have one, you can use a metal bowl over a pot of simmering water (double boiler method), but the microwave is just easier.
- Parchment Paper — Line a baking sheet with this. It prevents sticking and makes cleanup a breeze. Wax paper works in a pinch, but parchment is better for chocolate.
- Toothpicks or Forks — For dipping the truffles into the melted chocolate. Toothpicks are great for small batches because you can just lift them out and tap off the excess.
- Refrigerator — Obviously. You need space in the fridge to chill the truffles.
Pro Tip: If you’re making a large batch, have your baking sheets ready and lined before you start rolling the truffles. Everything moves fast once the dough is ready.
How to Make It: Step-by-Step
Alright, let’s make these Chocolate Peanut Butter Oreo Truffles! I’m walking you through exactly how I do it, including the little tricks I’ve picked up over the last few months.
Step 1: Crush the Cookies (5 minutes)
If you’re using a food processor, pulse the Oreos until they are fine crumbs. Don’t over-process them into a paste; you still want some texture. If you’re doing it by hand in a ziplock bag, crush them until they are fine enough that you can’t see large chunks of cookie. You want a sandy texture.
Step 2: Mix the Dough (3 minutes)
In a medium bowl, combine the cookie crumbs with ½ cup of creamy peanut butter and ½ cup of chocolate chips. Mix until a thick, sticky dough forms. The mixture should hold together when you pinch it. If it’s too dry, add a teaspoon more peanut butter. If it’s too wet, add a few more cookie crumbs. It should feel like playdough.
Step 3: Chill the Dough (15-20 minutes)
This step is crucial. Cover the bowl with plastic wrap and refrigerate for at least 15 minutes. Chilling firms up the peanut butter and cookies, making them much easier to roll. If you skip this, you’ll end up with a sticky mess on your hands. I usually put the dough in the fridge while I set up my chocolate melting station.
Step 4: Roll the Truffles (10 minutes)
Take the chilled dough out of the fridge. Scoop out about 1 tablespoon of dough and roll it into a ball between your palms. Try to keep them as uniform as possible so they look neat. Place them on the parchment-lined baking sheet. You should get about 24 truffles. Don’t worry if they aren’t perfect spheres; they’ll still taste amazing.
Step 5: Melt the Chocolate (3 minutes)
In a microwave-safe bowl, combine the remaining ½ cup of chocolate chips. Microwave in 30-second intervals, stirring between each interval, until smooth. Be careful not to overheat it. If the chocolate gets too hot, it can seize up and become grainy. If it’s too thick, add a tiny teaspoon of vegetable oil or coconut oil to thin it out. This makes dipping easier.
Step 6: Dip the Truffles (10 minutes)
Take each chilled truffle ball and dip it into the melted chocolate. Use a fork or toothpick to coat it completely. Tap the fork against the side of the bowl to let excess chocolate drip off. Place the coated truffle back on the parchment paper. Repeat with all the truffles. Work quickly so the chocolate doesn’t set before you’re done.
Step 7: Set and Serve
Place the baking sheet in the refrigerator for about 10-15 minutes, or until the chocolate is fully set. Once set, transfer the truffles to an airtight container. They are ready to eat! You can sprinkle sea salt on top right after dipping if you want that salty-sweet kick.
Expert Tips & Tricks
Here’s everything I’ve learned from making these dozens of times. These tips will save you from my mistakes.
- Keep Your Hands Cool — If your hands are warm, the peanut butter in the dough will melt and make the truffles sticky. Keep a bowl of ice water nearby to dip your hands in if they get too warm.
- Don’t Skip the Chill — I know it’s tempting to roll them right away, but the chill is what makes them hold their shape. If you rush this step, you’ll regret it.
- Thin the Chocolate — Melted chocolate is thick. Adding a teaspoon of oil makes it fluid, which means you get a thinner, more even coating. Thick chocolate coats can be hard to bite through.
- Use a Toothpick for Small Batches — If you’re only making 12 truffles, toothpicks are easier to manage than forks. Just twist the truffle on the toothpick to coat it, then lift it out.
- Storage is Key — These truffles are best stored in the fridge. They can get soft at room temperature, especially in the summer. Always keep them in an airtight container to prevent them from absorbing fridge smells.
Variations & Substitutions
Once you’ve nailed the basic version, here’s how you can mix it up. I’ve tried all of these.
- Gluten-Free — Swap regular Oreos for gluten-free chocolate sandwich cookies. Check the label to ensure they are certified gluten-free.
- Vegan — Use vegan Oreos (they are actually vegan by default in many countries, but check the label) and vegan peanut butter and chocolate chips. Many chocolate chips contain milk, so look for brands like Enjoy Life or Pascha.
- Almond Butter Swap — Swap the peanut butter for almond butter. It’s slightly more expensive but has a richer, nuttier flavor. It works perfectly.
- White Chocolate Coating — For a different look and flavor, melt white chocolate chips for the coating. It looks beautiful and tastes like a cookie dough ball.
- Crushed Candy Topping — Instead of sea salt, roll the dipped truffles in crushed peppermint candies or crushed peanuts for extra texture.
Serving & Storage
How to Serve
I usually serve these straight from the fridge, as they have a fudgy, firm texture that I love. But they are also great at room temperature if you’ve let them sit out for 10 minutes. They pair well with coffee, tea, or a cold glass of milk.
Storage Instructions
- Refrigerator: Store in an airtight container for up to 2 weeks. They actually get firmer and more fudgy after a day or two.
- Freezer: Yes, you can freeze these! Place them in a freezer-safe container with parchment paper between layers. They will keep for up to 3 months. Thaw in the fridge overnight before eating.
What Not to Do
Don’t leave them out on the counter for more than a few hours, especially in hot weather. The peanut butter and chocolate can melt and lose their shape. Also, don’t store them near strong-smelling foods like onions or garlic. Chocolate absorbs odors easily.
Nutrition Information
I’m not a nutritionist, but here’s the breakdown if you’re tracking. Keep in mind that these are rich, indulgent treats, so portion control is key.
Per Truffle (based on 24 truffles):
- Calories: 120
- Protein: 2g
- Carbs: 14g
- Fiber: 1g
- Sugar: 9g
- Fat: 7g
- Saturated Fat: 3g
- Sodium: 60mg
My Take: Look, this is a dessert. It’s sweet, it’s rich, and it’s meant to be enjoyed. It’s not a health food, but it’s also not made with junk. Real peanut butter and real chocolate are better choices than processed candy bars. When I make these, I limit myself to two or three, and I savor them. That’s the best way to enjoy them.
Final Thoughts
So that’s my go-to Chocolate Peanut Butter Oreo Truffles! I’ve probably talked your ear off at this point, but when you make a recipe this often, you have a lot to say about it.
This has saved me more times than I can count. It’s my answer to “what’s for dessert” when I don’t want to bake, when I need to bring something to a party, or when I just need a little hug in food form. My kids love them, my husband loves them, and honestly, so do I. They are my comfort dessert.
Make it yours! Try different toppings, swap the peanut butter for almond butter, or make them gluten-free. The best recipes are the ones you adapt to your tastes.
If you make this, drop a comment and let me know what you think! I love hearing how recipes turn out in your kitchen. And if something doesn’t work, tell me that too—I’m here to help troubleshoot.
Happy cooking! And I hope your kitchen smells half as good as mine does right now.
Frequently Asked Questions
Can I use crunchy peanut butter?
You can, but I don’t recommend it. Crunchy peanut butter will create lumps in the dough that make it hard to roll smooth balls. If you absolutely must use it, make sure to crush the peanuts as much as possible before mixing. Creamy peanut butter gives you that smooth, fudgy texture that these truffles are known for.
Why are my truffles too soft?
This usually happens for two reasons: either the dough wasn’t chilled long enough, or the peanut butter was too runny. Make sure you chill the dough for at least 15-20 minutes. If you’re using natural peanut butter, make sure it’s well-stirred and not too oily. If the dough is still too soft, add a few more cookie crumbs to absorb the moisture.
Can I freeze these truffles?
Yes! These freeze beautifully. Place them in a single layer on a baking sheet and freeze for an hour to harden the chocolate. Then transfer them to an airtight container or freezer bag. They will keep for up to 3 months. Thaw them in the fridge overnight before serving.
Do I have to use Oreos?
Technically, you can use any chocolate sandwich cookie. Nilla Wafers would work, but the flavor would be different (more vanilla, less chocolate). Double Stuf Oreos work great too and might make the truffles even richer. But classic Oreos are the standard for a reason—they have the perfect balance.
How long do these last?
In the fridge, they last up to 2 weeks. At room temperature, they last about 2-3 days, but they will get soft. I always recommend storing them in the fridge to maintain their shape and texture.
Can I make these ahead of time?
Absolutely. In fact, they taste better after a day or two because the flavors have time to meld. I often make them 2-3 days before a party. Just make sure to store them in an airtight container in the fridge.
What if I don’t have a food processor?
No problem. Put the Oreos in a heavy-duty ziplock bag and crush them with a rolling pin, a meat mallet, or even a heavy can. It takes a bit more effort, but it works just as well. Just make sure you get them into fine crumbs.
Can I use dark chocolate chips?
Yes, you can. Dark chocolate will make the truffles less sweet and more sophisticated. If you use dark chocolate, you might want to add a pinch of sea salt on top to balance the bitterness. It’s a great option if you’re not a huge fan of super sweet desserts.
Pin This Recipe!


Chocolate Peanut Butter Oreo Truffles: 3-Ingredient No Bake Dessert
- Total Time: 45 minutes
- Yield: 24 servings 1x
Description
These no-bake truffles combine crushed Oreos, creamy peanut butter, and chocolate chips for a fudgy, salty-sweet treat that is incredibly easy to make and perfect for gifting.
Ingredients
- 24 regular Oreos (or gluten-free chocolate sandwich cookies)
- 1/2 cup (120g) creamy peanut butter
- 1 cup (170g) semi-sweet chocolate chips, divided
- Optional: Pinch of sea salt
- Optional: 1 teaspoon vanilla extract
Instructions
- Pulse Oreos in a food processor until fine crumbs form, or crush them in a ziplock bag with a rolling pin.
- In a medium bowl, combine cookie crumbs, 1/2 cup peanut butter, and 1/2 cup chocolate chips. Mix until a thick, sticky dough forms.
- Cover the bowl with plastic wrap and refrigerate for 15-20 minutes to firm up the dough.
- Scoop about 1 tablespoon of dough and roll into balls. Place on a parchment-lined baking sheet.
- Microwave remaining 1/2 cup chocolate chips in 30-second intervals, stirring until smooth. Add a teaspoon of oil if needed to thin.
- Dip each truffle into the melted chocolate using a fork or toothpick, tapping off excess.
- Place coated truffles back on the parchment paper and refrigerate for 10-15 minutes until chocolate is set.
- Sprinkle with sea salt if desired and store in an airtight container.
Notes
Keep hands cool to prevent melting. Do not skip the chilling step. Store in the fridge for up to 2 weeks or freeze for up to 3 months. Use regular full-fat Oreos for best texture.
- Prep Time: 15 minutes
- Cook Time: 0 minutes
- Category: Dessert
- Cuisine: American
Nutrition
- Serving Size: 1 truffle
- Calories: 120
- Sugar: 9
- Sodium: 60
- Fat: 7
- Saturated Fat: 3
- Carbohydrates: 14
- Fiber: 1
- Protein: 2
Keywords: no bake dessert, oreo truffles, chocolate peanut butter, 3 ingredient recipe, easy dessert, gluten free option, vegan option


